Yes Chris. That's the stuff alright. We only have it in the barn which, I guess, is a bit damp. Do you think it is the calc in the stone reacting to water? If it is that then I should think dealing with the damp is a priority. It's a nasty looking substance, isn't it?
Kit, I'm sure it's caused by damp, and the annoying thing is I'm sure I've read about something you can apply to block it. Just don't remember where...
Looks great!
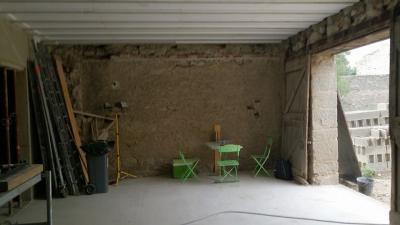
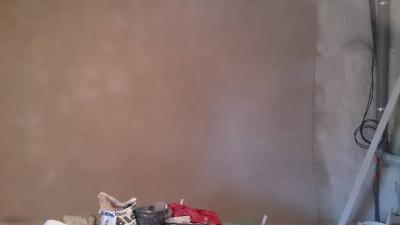
The white fuzz is saltpetre, caused by moisture pushing through the stonework. This would indicate that the pointing or repairs to the stone, have been done with mortar that most likely has some cement in it. The close-up of the end of the mantel shelf, shows a repair, which seems to be effecting the stone. There is a Saint-Astier ready mixed product called Lithomex, especially formulated to repair stonework. The attached image shows damage caused by a cement based repair pointing. The pointing is not servicing the moisture of the masonry, resulting in it having to force its way through the stone. Pierre apparent has no provenance in domestic dwellings. It is the result of interior designers creating a trend, which though looking romantic, actually is a real pain in the neck. It collects dust, which is virtually impossible to rid of. The interiors of the french houses were plastered with chaux aérienne paste, often called Lime Putty. You can make your own, or buy it ready made. The sellers usually guarantee it is over three months old. It lasts forever if kept under a layer of water, and the longer you keep it, the better its quality.
1 Like
This is what happens when you render an old wall with cement mortar. In most limestone areas, the binder is marle clay, also known as, adobe and cob (Devon). You will come across marle holes, which are quite dangerous, as they can be up to fifteen feet deep. The same clay is used to make the roman foof tiles.
1 Like
Is it exactly the same process for re-pointing an exterior stone wall?
The sand used for pointing rubble stone walls can be as rough as you like. You can, in most cases actually use concrete sand, which has some large stones, as well as light sand. Vernacular buildings usually have a fairly rough exterior render. Manor houses and the like, most often have a neat smooth final coat, and the St-Astier ready mixed NHL 2 is fine for that. I can't remember the french name for it, but in Eire it's known as Eco-Mortar. If you phone the factory and speak to Laurent Tedeschi, the tech director (speaks English) 0553 54 1125, he will tell you all about it. The general rule for pointing sand is that the largest grit (grade of sand) in the sand should be no more than one third of the joint. So, for rubble walls, the coarser the better. Random stone walls, not often found in limestone areas, can also use a fairly coarse sand. For brick walls, the third-rule applies. Ashlared (cut) stone with very fine joints requires a fine sand, and you have to use a pointing iron for it and brick, which comes in various sizes. They look like an artist's pallet knife. The common or garden bricklayer’s trowels are not suitable. For pointing and dubbing-out rubble walls, use a gauging trowel: they have a rounded end. For brick and cut stone, the pointing should be square and not sloped. It also should be set back from the surface. Rubble stone walls are made up of field stones, which do not interlock. They were built using a shuttering system; not unlike concrete. Randon stone consiste of irregular pieces chose to interlock, and sometimes are chipped and hacked to make them suitable. Maisons paysannes de France is a nation wide association, which has depots and help centres in most departments. They have a good website. Below are two of the links: national and the Limousin. www.maisons-paysannes.org mpflimousin.free.fr
1 Like
Vincent, thanks for the comprehensive reply. The end of the mantle does have a very small repair that's been bodged in the past and actually most of the original pointing in that area has long since dropped out. The outside exposed stones that the fireplace has been built onto shows no sign of damp, saltpeter etc. Could it be some form of rising damp in that area perhaps?
Chris and Co
Damp has three sources: rising, penetrating and condensation. Rising damp rises to about one metre above the ground by capillary action. Penetrating damp has many sources, most common being broken down-pipes. You will get some damp from condensation on cement internal renders and certain hard stone like granite and shale, which do not absorb moisture.
Internally, you can use insulating plaster, which is a mix of lime and chopped hemp, to cover them. The hemp in question is the stuff supplied for horse bedding, so don't be ripped off by some of the eco suppliers. This plaster is then finished off with a finer coat of lime plaster. Using such things as vinyl paints also causes condensation, because they stop the walls managing the house atmosphere. There are various lime paints on the market, which, in reality, are tarted up whitewash: plain hydrated lime.
Hand-held hopper guns certainly make a job quicker, but you need an assistant to keep up the supply of mortar. You then use a derby or a straight light plank to skim off any high points on a render.
Pointing rubble stone is not easy, and you’ll never get the original flat finish, because that was achieved, when they were packing the binder and stones into the shuttering.
The columns of cut stone, you see placed at intervals along walls and on the walls of houses, which look a bit crosses of Loraine, were there to align the shuttering and to support any beams, in the case of house walls.
Going back to the cement story. You will notice that the long walls, on estate boundaries, have no expansion joints. Some of these walls can be up to one kilometre or more between gates. A cement bound wall has to have expansion joints every few metres, otherwise they will fall down. Like railway lines, they need room to move in heat and cold.
You must not use any plasticizers or other additives, especially PVA or EVA, because they interfere with the setting of a lime mortar, which is only partly chemical, unlike cement mortars, which are completely chemical. Painting the surface with PVA or EVA also interferes with the wall’s moisture and heat management.
2 Likes
We've just done our stone house with hemp and lime render and various lime plaster finishes. We used hemp sprayed onto the walls - the amount of materials seems huge
it was scraped down and afterwards they were removed leaving a lot of leftover wet hemp
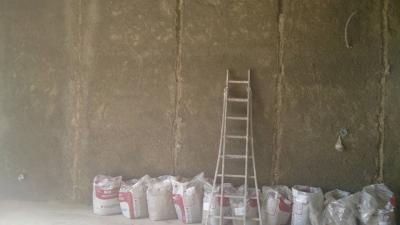
then the first of two layers of smoother lime
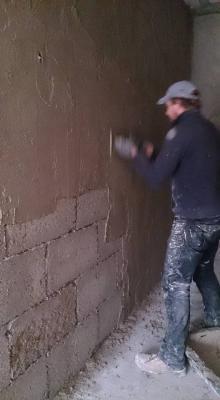
the left is the smoother like and the right where the gaine technique is still shows the rough lime
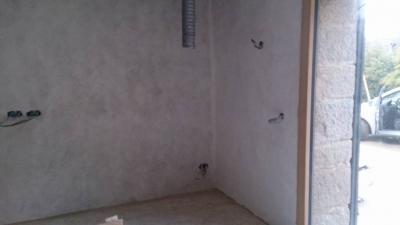
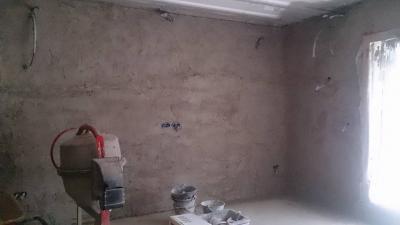
and here with a first coat of limewash or badigeon (sounds like badijon) to me. There are two more coats of badigeon to go yet and the tub is sitting outside in water. They mixed it up themselves and to be honest this seems quite easy to do this bit.
The finish on this level is smooth but not silky, on the upper floor it will be a matt stucco finish so even more silky and smooth. The upper level is the closest to UK plaster I have seen. We won’t be finishing this until after the ceilings have been painted.
The lower floor did have salpetre before we started so we wait to see if that comes through the hemp and lime! I was told it was due to animal urine secretions in the soil causing salts to come up with moisture through the stones. Our downstairs was formerly the stable. Though there are very early concrete mixes around the floor area (which we have concreted over after installing a french drain below and put in 12cm floor insulation and a wet floor heating system in a liquid shap which will then be tiled. We also have installed a double flux VMC so I am hoping that we won’t get humidity down there but time will tell!
1 Like
Yes Howard, make sure you do it when the temperature is not going to go below 5 degrees or above 30 for a few days to be sure not to freeze or evaporate the moisture. Direct sunlight is bad news, use a tarp or some sort of shade if neccessary. Good luck!
Suzanne
I notice you have concrete blocks in one picture. if they are bound with cement mortar, you might have some cracking later on, because of the stresses between the concrete and the lime plasters, since the cement binder effectively makes the wall a solid single unit. French concrete blocks don't have the same specs, as those in the UK and Eire, which is another factor. This was explained to me by one of UK suppliers of lime mortars.
Non hydraulic lime sets by "carbonation", drawing the carbon dioxide back out of the air, in the process, making it an eco friendly material. Hydraulic limes set by partial chemical set and carbonation.
The process of making building limes and cements, involves the burning of limestone, which causes the carbon dioxide and carbonic acid to be driven from the stone. The end product is quick lime, which is then slaked (mixed with water/ hydrated) to form plain hydrated lime and hydraulic lime.
Only certain areas have natural deposits of pure hydraulic limestone, thus the addition of cement for the HLs and FLs by companies that don’t have suitable quarries. In the slaking process, the hydraulic limes are turned into powder, because they will set if left wet. Non hydraulic lime is either left wet to make the paste/putty or turned into a powder. You can make your own putty by tipping plain powder lime into a bin and covering with water.
In the process of making cement, the process is slightly different, resulting in cement setting entirely by chemical set: no reclaiming of carbon dioxide.
In the older buildings, cement concrete is to be avoided, and you should use limecrete. One of the largest rafts of limecrete is on Angelsey, North Wales. It is in a large cowshed, has no plastic sheet or any expansion joints. In the alternative energy centre in Wales, there is a huge project under way, using limecrete made from St-Astier lime. The good thing about limecrete, is that it can be done in a leisurely manner, unlike standard cement concrete, which sets very quickly, with workers running round in a mad panic! limecrete also doesn’t react with calcites, so doesn’t need a plastic sheet.
I’ll discuss this, in the coming Culture Gap Programme to be posted on our FB page this weekend: part 4; the old house.
Here is an example of a french house in Normandy, made entirely from marle clay. Obviously there was no source of field stones, or ramdom stone. There are, however, some pieces of cut stone around the front door and the best room window. I took this shot in 2004, but haven't been along that road since, so I don't know what the situation is now. You can see the remains of a lime render on the gable end.
I completely forgot that pics can be pasted into the text. 
1 Like
Lime putty: the pic shows some I made earlier!! Six years ago, in fact. The longer tou keep it the finer the lime particles become. Just tip a bag of plain hydrated lime into a bin, top up with water, poke it around to make the water mix in. Always make sure the top is covered with a layer of water. To use it, slap it about to make it cream-up. Don't add any extra water, unless you are making limewash. For fine plaster, sieve it to remove any lumps.

1 Like
Deeper holes made need to be filled and the lime mortar tapped back. A stippled brush finish is best rather than a brushed finish. Bash the surface gently with the brush head (a stiff churn brush is best).
A useful document can be found on the Historic England Web site (It can be downloaded as a pdf file). The techniques shown are for any wall in France or the UK!
https://historicengland.org.uk/images-books/publications/repointing-brick-and-stone-walls/
Matt Noble
I see in the original photos of this thread the guy is using a trowel. Not surprised it was a tedious process for him.
The best way of doing this is to wear big thick rubber washing up type gloves and to literally throw the chaux into the joints and then push it in with the palm of your hand until the stones are literally hidden. ALWAYS start from the bottom and work up. NOT, from the top down.
The top will will dry quicker than the bottom so you can start smoothing the joints with a wire brush, soft brush and then Sponge working from the top downwards. You could do that wall in a couple of hours.
Also, NEVER go grey with the chaux colour. It looks horrible.
1 Like
Personal preference, I’d use a small trowel every time.
Using a trowel is fine, but to do it properly with a trowel you are supposed to ‘throw’ the chaux into the joints…not scape it in. Which takes a lot of skill. I think you will find washing up gloves and using your hands ‘throwing it in’ is better and more accurate !!!
Filling the joints with a trowel is a complete waste of time.
Jointing old stone walls is an art.
Number of other points.
-
No mortar…should be banned in old buildings.
-
Always mix the chaux by hand and not with a mixer. They should be banned to.
1 Like
Is Chaux the same as Lime Mortar?