Any suggestions please for any “easy/easier” ways to remove cement from the back of old terrace tiles that I now need to use to replace broken ones.
Suggestions/ advice appreciated. Thanks.
Any suggestions please for any “easy/easier” ways to remove cement from the back of old terrace tiles that I now need to use to replace broken ones.
Suggestions/ advice appreciated. Thanks.
I don’t think there is an easy way, or any way without risk of breaking them. If the tiles are thick, you could carefully grind the cement off, but very messy. The other option would be to remove enough substrate to sit the tiles in without trying to remove the cement.
Hydrochloric ? Carefully applied, of course
Place the tiles face down on a bed of soft dry sand and use an angle grinder with a fairly large masonry disk at a slow speed and at the lowest angle possible. Be sure to wear a face mask, eye protection and ear defenders and keep other people at a distance. It’s a messy activity best done out in the open air as it creates a lot of dust. Try to pick a time of day when the neighbours will not be too upset by the noise.
Working from the edges towards the middle reduces the risk of breaking the tile, so turn each tile frequently during the process so that you can work inwards from the different edges.
I have done this following pretty much the same procedure as Robert suggested above. It works but is very laborious and to be honest if I costed my time at 20 euros an hour it would have been cheaper, easier and safer to buy new.
Of course they may well be dalles that you are particularly attached to, impossible to replicate or needed to finish an existing pattern in which case I guess the only option is the hard grind (no pun intended).
Good luck.
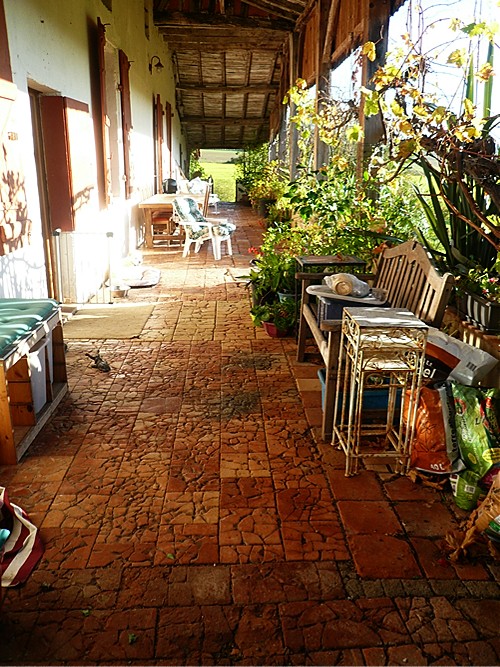
Thanks for the thought. Ours is a 300+ year old house. No idea when the terrace tiles were laid - straight down onto earth - and no idea where the “spare” ones with cement on come from, but they are in keeping.
Given that the cracked ones are straight down onto earth, I may just finish up excavating out more earth. I’d hoped though to bed the replacement tiles into tile adhesive as they are likely to crack again otherwise. Our whole house is moving gently down the hill, but given that it’s been here as long as it has we’re expecting it will outlast us.
Someone told me leaving them outside with the cement down onto bare earth can help soften/loosen it. Any thoughts/views please?
Certainly soaking the tiles in a bath of water will help to soften some types of old mortar, and if nothing else, will definitely reduce the amount of dust created by the angle grinder.
I personally would never suggest using an angle grinder, even in the right hands, they are blinkin dangerous.
Every person should have one of these, there’s loads of jobs they can do, and safe to use  they do a mains powered one as well
Thanks for the suggestions guys, but unfortunately I don’t have the pay grade to use dangerous acids or angle grinders. (Though I do have one of the latter and have used it about twice, reluctantly.)
I’ll try the soaking Robert as I think I’m wrong in describing it as cement - it is an old mortar and could well loosen up a bit.
I tried a chisel and hammer on a couple earlier and it’s taking me about 1/2 hour per tile. But then I’m not trying to do the whole terrace, just the really bad patches.
My vote would definitely be for careful use of an angle grinder with a diamond tile cutting blade, but I understand your caution.
Hi Sue,
The reason that the tiles are cracking is that the earth underneath them is not providing equal support across the entire surface of the tile. The most thorough way of rectifying the problem of the shifting earth would be to take the whole lot up, lay a re-inforced concrete base, and then re-lay the tiles on the top. That way the base will never move and so the tiles will not crack any more.
However, I recognise that such would be a very expensive and time consuming exercise, so here is an alternative method of preventing replacement tiles from cracking.
Turn the tile upside down and make a wooden frame from roughly half inch thick wood that sits upon the edge of the tile so that you have a wooden wall about two and a half inches tall around the tile. Buy a bag of ready mixed concrete from your local DIY store (about 4.50 euro for a 25 kilo bag), mix up a small quantity with water so that it will just about stand in peaks, and fill the wooden frame with it, smooth it off and allow to dry thoroughly. The tile is now uniformly around 2 and a half inches thick and much stronger than before as it is now bonded to the concrete ‘slab’ that you poured onto it, and you haven’t had to remove any of the old mortar which is stuck to it. ![]()
Excavate both the damaged tile to be replaced and a depth of soil from underneath it and line the bottom of the hole with dry sand.
Take two strips of thick but flexible plastic cut from an old carrier bag, compost bag, mattress delivery cover or similar, which are about 12 inches longer than the width of the tile, and lay them across the hole that is to receive the newly reinforced replacement tile.
Lay the replacement tile into the hole and check its level relative to the tiles surrounding it.
The plastic strips will enable you to easily lift it out to make adjustments to the level of the sand beneath it.
Once the replacement tile is at the right height having tamped it gently into place, then just cut off the ends of the plastic strips with a sharp knife or small pair of scissors and push the remaining ends down into the joint spaces around the tile so that they are out of sight.
Now you need a dry mix of 6 parts sand to 1 part cement to brush into the joints around the tile until the joints are nearly, but not quite, full to the top.
Spray gently with a very fine mist of water (a garden sprayer is good), cover with a board propped up on a couple of bricks or wooden blocks to prevent heavy rain getting to it, and allow to dry.
Your replacement tile will never crack again as it is now effectively a solid concrete block. It may tilt a small amount over the years, but it will never crack again.
If you want the joint filler colour to match the rest of the stonework of the house / garden, try to find an area of stonework that doesn’t show (the back wall of the barn or garage for example), and scrape out some of the sand grit mixture from between the existing stones, grind it down into a fine sand between the heel of a stout boot and a piece of thick plywood laid on the ground, and use that as the sand for mixing with the cement for filling the tile joints. It will dry to a colour that is very close to that of the mortar between the stones of the wall from which you took the scrapings.
Bonus Tip: If you are ever having to cut a new opening for a door or window into a stone wall, or if you have a tumbly down wall somewhere, then save some of the sand/grit mortar in an old bucket or cement bag to use to mix with a bit of cement when making repairs elsewhere. In this way your new repairs will have the same colour as the existing mortar around the original masonry and will look just like the original surface after it has weathered for a year or two.
@Robert_Hodge Wow Robert, thank you so much for this. I’ll post a couple of photos in a while so you can see the scale of what we’re talking about.
We’ve been here now 12 years and doing the terrace “one day” has always been on the list. The old tiles are wonderful but now very damaged from our constant use of the space. So I’m doing the areas that have the heaviest footfall.
Ah !!
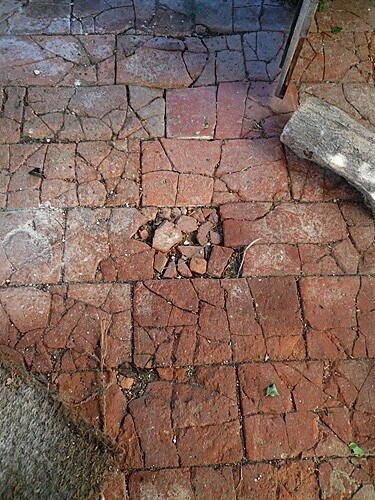
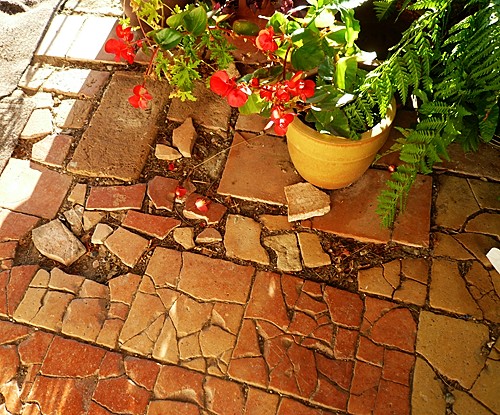
Well to be honest what you seem to have there are a few good tiles amongst a sea of builders rubble that just happens to be reasonably flat.
Do you have enough spare tiles in stock to re do the entire damaged area ? If not, then you may wish to obtain some more compatible tiles of a suitable exterior terrace grade before starting the job.
Perhaps you could obtain some old bricks or tommettes and create a different pattern down the middle of the terrace that would be more durable.
To be honest, I would say that the only viable option is to salvage the good tiles and tear up the rest and start again by excavating some of the earth and laying a decent substrate base of compacted rubble or reinforced concrete and then tiling on the top.
You are fortunate to have such a large and shady terrace, and I can understand why it is so well used. However , it is clear that it requires some substantial attention which is going to take time, so perhaps you can do it in sections to make the job more manageable. Doing it that way will also be less daunting, as once you have done the first 6 foot length you will be keen to continue the wonderful improvement throughout. 
I think you need to make a plan drawing of the area, make several copies of it, and then draw in various options to see which you find the most visually appealing.
For example; How about a walkway of old bricks or tommetttes down the middle with the salvaged existing good tiles used along the edges where they will not have so much wear ?
In the main, I think that the most important thing is to recognise that the old tiling has simply come to the end of its life and has to be replaced, though this obviously has to be done in a way that is compatible with both the style and epoch of the building and the depth of your pocket.
Please feel free to PM me if you would like to discuss the matter further at a more technical / practical level.
An indication of the region in France where you live would be helpful, as would a close up photo of the broken edge of one of the tiles, together with its approximate thickness.
Have a safe Sunday.
@Robert_Hodge Thanks very much for this Robert. I may well take you up on your generous offer to discuss this further in a PM, if I may. Excuse me if I go quiet for a while though as we are having brilliant weather for the next few days and I need to get some trees planted and then lawns mown.
Pocket has no depth at all at moment (hence my plan to just patch the worst bits using what we’ve got) and we live in Lot-et-Garonne.
That, sir, is an inspired description!
With the caveat that i’m not a builder, nor even that good at DIY I suspect that Robert is right - finding a “sympathetic” tile and relaying small sections at a time on a properly constructed base is probably the only viable option.
That said a chink of my mind thinks that the mini crazy paving look is sweet, and gives the impression that the tiles have been there for centuries - but I’m not sure how you would preserve it while at the same time constructing something which will last.
I think Robert’s idea of a mould and cement would still work, at least with the tiles that are not totally destroyed - but 2½ inches is quite hefty, I wonder if adapting the idea slightly and bonding the fragments to a modern tile with an epoxy would keep the “patina”, at the same time as providing something not too thick (it would come out maybe 2cm) to set on a new base.
It would be an excruciating amount of work though.
Well, were it to be an ancient Roman mosaic, then one could fix the existing fragments in place by brushing a dry mix of cement and sand of suitable colour into place, spraying with water to set it, and then, having built a small bund retainer edge around the perimeter, filling the whole area with a self-levelling see through acrylic resin to stabilise and bond it all together.
Altogether lots of work, certainly not cheap, and at the end of the day perhaps not the aesthetic finish that Sue might prefer.
Personally, I think that there is scope for constructing a replacement floor using recycled materials that would be in keeping with the period of the rest of the building, and which over time could probably be acquired for very little money, or even for free.
These things are always a trade off between speed and cost at the end of the day. A professional builder could fix it quickly but at substantial cost, and doing it oneself will be a labour of love but much cheaper.
@SuePJ Don’t worry. I’m sure that a suitable solution can be found with a little inspiration.
My reaction as well Paul! I think along the entire terrace there are about a dozen good tiles.
And you are right about the fact that we were entranced by the aged / crazy paving effect when we first bought the house 12 years ago. In fact the people who had looked after the house for the previous owners said they hoped we would keep the terrace. But the previous owners only used it as a holiday home and some years didn’t come at all so footfall over the time they used it must have been very light. We live on the terrace and it’s now beginning to look very sad. Without doubt we’ve got rodents burrowing underneath which increases the instability of the tiles.
In all of this buying “new” tiles for the moment is not an option. We do know someone who would do a grand job as he restores ancient properties. In time, we hope to go down that route, but for the moment, we need to improve (if only slightly) what we’ve got. Interesting how lockdown and not having anyone in the house except an emergency plumber is forcing us to look at how we live.
@Robert_Hodge Thanks for your encouragement Robert
@Robert_Hodge Just a naïve thought Robert - you are recommending that I back the tiles with fresh concrete to stabilise them, while I am busy removing the old mortar. Do I need the concrete? What if I just leave the mortar even though it’s uneven? After all, I do have the option to dig down into the earth - it’s not like I’m trying to lay them onto a flat/level substrate
Hi John,
Totally agree - our (second) multi-tool gets used for everything.
@SuePJ
Even safe enough for our 5 year old to have cleaned some mortar of of the back of paving slabs to top a wall.